Showing posts with label free tutorial. Show all posts

Wednesday, March 26, 2014

Amber's Mouse-tastic Laurel with Applique Collar Pattern

I'm a big fan of Colette's Laurel pattern. Simple to make and simple to wear, it has an easy, flattering silhouette. I've made a few Laurels, both the shirt and the dress version, and it is a perfect wardrobe staple. You can even whip one up in just a couple hours, so there's really no reason not to make a bunch!

Pattern: Laurel by Colette Sewing Patterns
Fabric: Lizzy House Catnap fabric, 1 7/8 yds + 2 yards of bias tape
Size and style made: Version 4, size 2 at bust & size 4 at waist
Alterations: appliqued collar (downloadable pattern below) & buttons

The Laurel is easy to embellish--I decided to amp up the cuteness of this mouse print from Lizzy House by adding a contrasting appliqued collar to mine, and three peach flower buttons. I was inspired by my dear friend Sara's adorable collared Laurels.


If you want to embellish your own Laurel with this cute collar, just click below for a PDF with easy collar instructions and pattern.

Click here to download the collar pattern


What could be more perfect than a springtime bike ride in my mice-on-bikes Laurel? 


Friday, November 15, 2013

Craftastic Weekend Project: Needlefelt Mushrooms

For this weekend, we have a mushroom needlefelting tutorial. Needle felting is a dry method of making felt (matted wool) using a barbed, triangular needle. It is easy to learn and can be conceived of as sculpting with wool as your medium and the felting needle as your tool. Roving is the name of the wool that has been cleaned and carded (brushed). Amber is an amateur mycologist, so for this project she was inspired by Clustered Bonnet mushrooms. If you live in the Denver area, we will be doing a free make-and-take of this craft project at the Clyfford Still Museum from 5 - 8pm tonight. 


For this project you will need: (all materials are available at Fancy Tiger Crafts) Our finished mushrooms are 1" - 3" tall and the caps are about 1" - 1 1/2" in diameter. One ounce of fiber will make 5 - 6 mushrooms.
  • White Wool Roving - mushroom stem and cap
  • Light Grey Wool roving - mushroom cap
  • Pale Brown Wool roving - mushroom cap
  • Foam block - used as a work surface to protect your needle and your fingers
  • Felting Needle - we used a size 40
  • Chopstick


Step 1: Make stem. Pull a piece of white roving - about 1" by 3". You can just pull it apart gently with your hands - no need for scissors. (If it is hard to tear, move your hands further apart along the roving and it is easier to break.) Wrap this strip tightly around your chopstick. Now pull the roving off of the chopstick - it should already look stem-like without any needle felting. Place this on your foam and needle felt it while turning it over so it is even on all sides. To needle felt, poke the needle into the stem about 1/4" to ½" deep and at a 90 degree angle. Leave one end fluffy - this fluffy end will be used to attach the stem to the top. 


Step 2: Make cap. Pull a small amount of white roving and lay it on your foam. Repeat with the grey and then brown rovings, pulling a smaller piece for each color (brown being the smallest). Now wrap this strip of neutral roving rainbow into a spiral. The white should end up on the outside with the gradient to brown going toward the center. Now needlefelt this round shape until it holds together - you should end up with a flat disk.


Step 3: Attach stem to cap. First you can shape your cap with your hands so that it has a dome shape instead of a flat shape. Next, you will attach the stem to your mushroom cap by poking the fluffy end into the underneath of the mushroom top. Poke it all around until the stem is firmly attached to your mushroom.


Yay! Now repeat and vary your size for the ultimate cute factor. For a lovely display we attached our mushrooms to a real log using hot glue. This would make the perfect centerpiece for your next foraged meal with friends or family. If you want more needlefelting, be sure to check out all of our awesome kits!

Wednesday, December 05, 2012

Vintage Pattern Paper Stockings for All!

Our stockings are hung by the chimney with care. Now that we have a sweet fireplace in the shop we knew we needed stockings for all of our lovely Fancy Tiger Crafts staff. We were inspired by ones we saw in Country Living magazine and whipped these beauties up.


We found vintage sewing patterns at Boss Vintage Clothing, our neighbors down the street, and used our matte finish iron-on vinyl to stablize the fragile pattern paper. The stockings were then cut out using our stocking template (download our pdf here and tape the two pieces together to make your template). From your vinyled pattern paper, cut out one stocking front, flip the template and cut out one stocking back. Don't throw away the protective paper from the fusible vinyl yet.


We wanted to personalize our stockings so we used the monogram templates from this awesome vintage reproduction French book, Monogrammes. We love this book, and it is available here at Fancy Tiger if you need some letter templates of your own!

To make your own monogram start with wool felt and wonder-under fusible adhesive. Iron the wonder-under to the back of the wool felt. Trace and cut out each set of initials from the wonder under backed wool felt and iron the letters onto the fronts of the stockings, using the protective paper between your iron and the vinyl on your stocking.
 

We sewed the front and back together with wrong sides facing so that the stitching shows up on the edges. As you sew the top right of your stocking, insert a folded 3" piece of trim on one corner for hanging. Ta da!
 

Happy Holidays from all of us!

Friday, July 06, 2012

A Crafty Visit to Yunnan, China!

--Emily

This May Amber and I took a trip back to Kunming, the capital of the Yunnan Province in China. I say "back", because we both lived there for a time in 2004-2005.

Jeff and Georgia with their new Double Happiness Quilt

Our return to Kunming was to visit our cousin, Jeff, and to celebrate his marriage to his love, Georgia. We were so excited to finally meet her, and attend their wedding! Amber and I decided to make them a quilt, complete with a special double happiness block. Double happiness, or shuāngxǐ, is a traditional motif used in weddings. You can see this special block in the lower right corner of the quilt. (There is a tutorial at the end of this post if you'd like to make your own!)


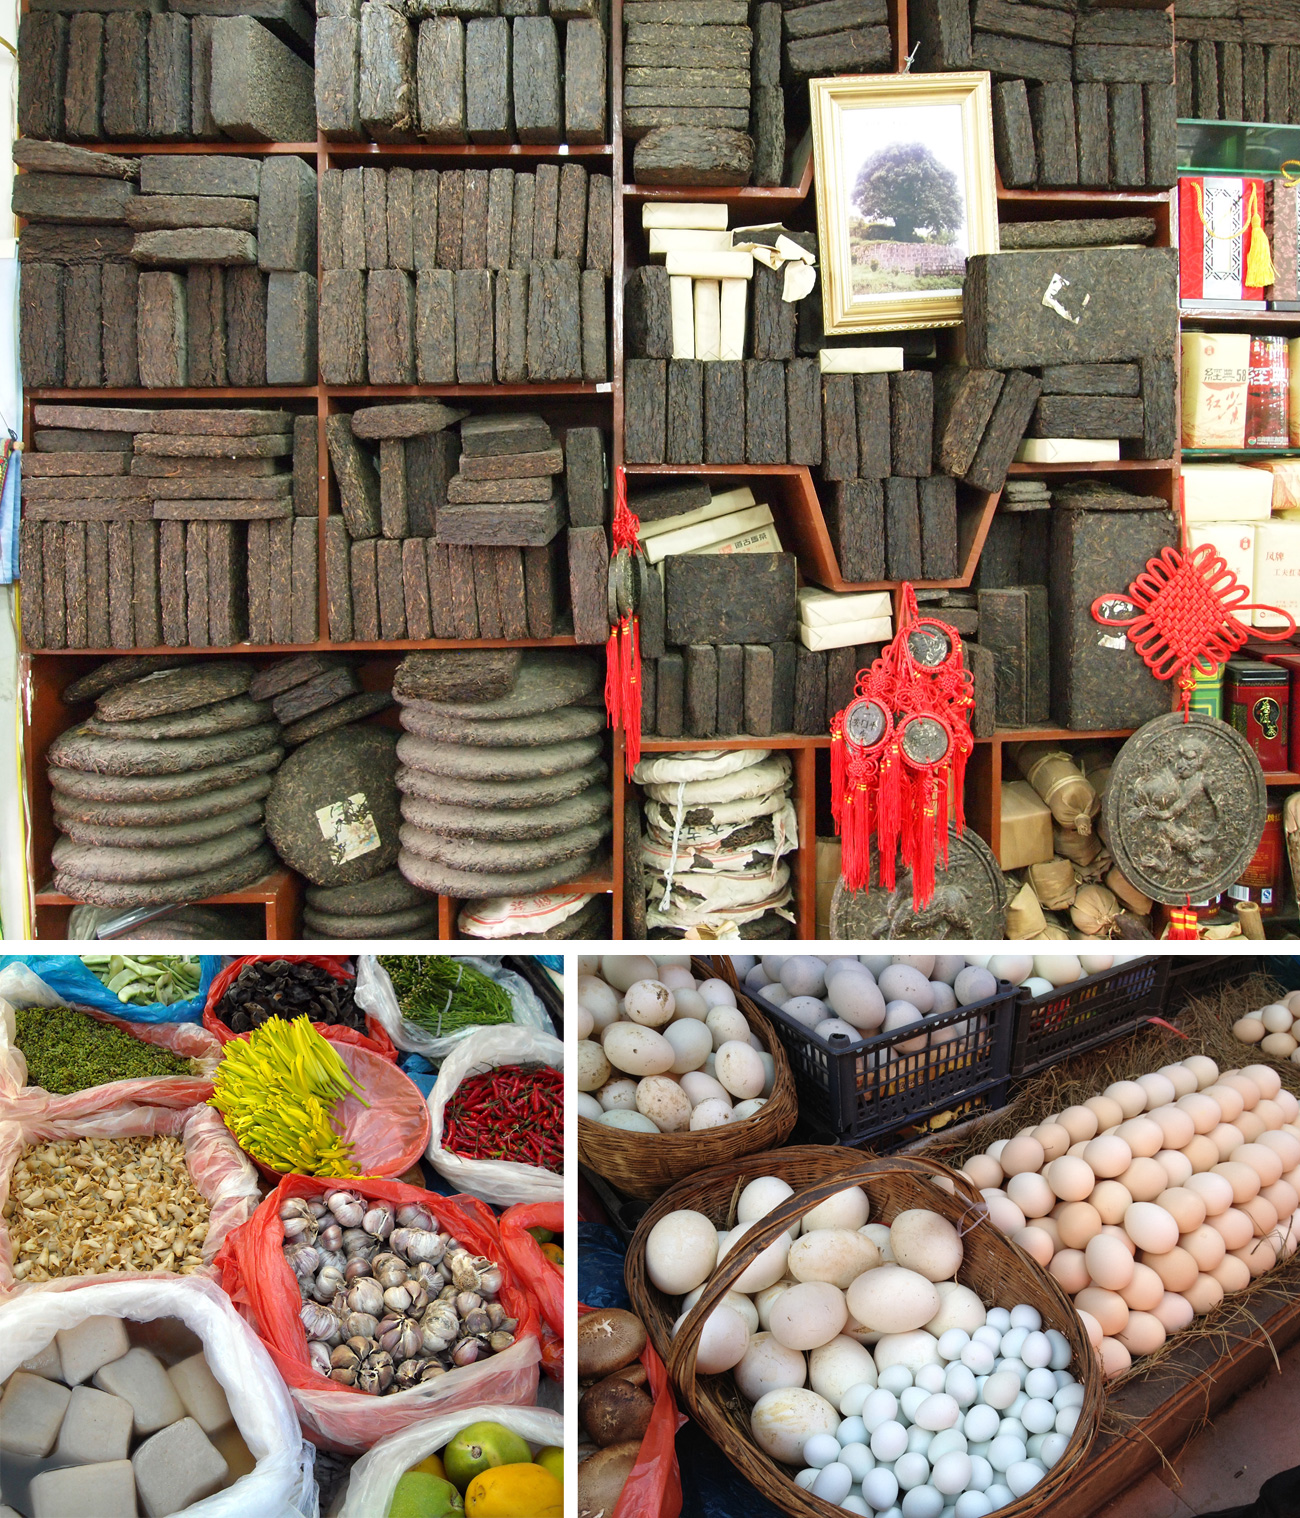
Kunming has a special place in my heart. Amber and I lived there for a year and a half, and really fell in love with the city. It is always a pleasure to wander the markets in Kunming. There is a major farmers market within a short walking distance of almost anywhere in the city, and the variety of foods available is astonishing. Even at restaurants, there is a beautiful display of fresh produce and meats to choose from. Often non-chinese speakers in our group (hi, mom!) could pick out a few dishes just by gazing in wonder at all the beautiful fresh produce. Yunnan is also a special place for tea, especially puer tea. You can see above the bricks and cakes of puer tea. Puer tea is aged, sometimes for decades like a fine wine, and I have heard there is some still aging from the Qing Dynasty.


Yunnan is an amazingly diverse place. It is one of the most biologically and culturally diverse areas in China. There are over 25 distinct ethnic minorities in Yunnan which often have unique language, crafts, and traditions.

Intricately Tie-Dyed Jacket

Handwoven fabric vests embellished with applique & cross-stitch and Jacket embellished with hand-made metal studs

A visit to the museum was a special treat, with traditional handmade garments from so many different cultures, and amazingly familiar fiber tools elegantly crafted.


Clockwise from top right, a gorgeously carved niddy noddy, a rustic yarn swift with a base made of tree roots, a simple but elegant Miao loom, and three copper drop spindles and a copper comb for separating bast fibers.


Shi Zhijie's textile art

We also visited our dear friend Liu LiFen's art gallery, 943 Studio Group. We were immediately enamored with Shi Zhijie, a local textile artist who's work is on display there. Her textile work was breathtaking, from beautifully quilted silk jackets, to a human-sized, freaky rabbit doll made with her own printed fabric.


Some of the local people at the nearby restaurant were taking a break and crafting it up too. This is a gorgeous piece of needlepoint!

We asked around for tips on knitting stores, and the craft craze hasn't hit China quite like it has here. To get our hands on some yarn we had to trek by cab out of the city to a giant wholesale market in Chengong, one of Kunming's suburbs. This place has everything for sale, and is where small shop owners go to get goods to sell to the public. The building itself extends from one freeway exit to the next--more than a mile long! We had to trek for about 30 minutes to get from the entrance to the knitters shops. We saw the piles of neon yarns and knew we had arrived!


There was a lot of polyester to be found, but we finally happened upon some shops selling cashmere, wool and marten yarns. Apparently marten is a pretty common fiber in China! Even this "Coors Light" yarn is made with it!


This adorable shop owner was selling beautiful wool yarns and was happy to show off her project.


As we shopped several women from the nearby stores noticed us and came to chat. We showed off our projects, too, and the ladies all loved our lace shawls. They had never seen anything like the lace knitting we were working on and asked Amber for an impromptu lesson.

We had lots of fun in China and wish we could go back more often. There were too many fun places and people to meet! I may just have to make myself a double happiness quilt to remind me of our fun times, so here is Amber to share her quilt block tutorial.

Double Happiness (Shuāngxǐ) Block Tutorial

Double happiness is literally the Chinese character for joy, but doubled and smooshed together. It is symbolic of happy occasions where two people bring joy to each other, such as weddings and new babies. The double happiness character is traditionally in red, a most joyful color in China, so I chose a bright red print and a lighter neutral for the background.

You won't need much fabric for this little block. You could get several out of a quarter yard, but a few scraps would be perfect!

Cut out the pieces shown in the diagram above. A rotary cutter, clear ruler, and cutting mat are going to be necessary for this tiny piecing. You will need to cut:

Red Fabric
18 of A (7/8" x 1-1/4")
12 of B (7/8" x 2-3/4")
1 of C (7/8" x 5-3/4")

Grey Fabric
16 of D (7/8" x 1-1/4")
5 of E (7/8" x 2-3/4")
2 of F (1-5/8 x 1-1/4")
Be very careful to keep a consistent 1/4" seam allowance. A quilters 1/4" foot is helpful.

Starting at the top of the diagram above, sew each strip across as follows, right sides together and shorter raw edges together. Press your seams after making each strip:

1) 5 strips of D+A+E+A+D

2) 2 strips of B+D+B

3) 4 small strips of A+D+A (shown at the bottom of image 3 below)


4) Now make a tiny block by sewing a B piece to the top and the bottom of each of the smaller strips. Press. Repeat for a total of four little blocks.

5) Take an F piece and sew a small block from step 4 to each of the longer sides of the F. Repeat with your other F and the remaining blocks. Press.

6-11) Use the second schematic diagram above as a guide, sew all your strips together to make your double happiness.

12) To make and 8" block, I cut 1-1/2" strips from my grey fabric and framed in the double happiness symbol.


Ta-da! Now stitch this into something pretty and give it to someone you love. Here's some ideas:

  • With 1/4" of insul-brite and a fabric for the back, make a cute potholder for the wedding of dear friends.
  • Applique onto a changing mat or diaper bag to welcome a new baby.
  • Make a bigger border and turn it into a decorative pillow for an anniversary gift.

Friday, November 18, 2011

Free Tutorial: Ysolda's Pocket & Ties Skirt!

Jaime and I had tons of fun with Ysolda on her visit to Fancy Tiger!

As you might have guessed, we spent a lot of time knitting and discussing things yarn-related with the adorable Ms. Teague... but, you may not have guessed that we spent quite a bit of time discussing our mutual love of sewing. Not only is she a masterful knitter, Ysolda is an amazing sewist as well!

We spent some time in our sewing studio and before we knew it Ysolda had whipped up a cute skirt of her own invention. We were so enamored with it that we asked her to teach us her crazy amazing sewing ways. Now we'd like to share it with you!


Click below to download the tutorial!


We hope you enjoy stitching up this cute skirt as much as Ysolda, Jaime and I did. Be sure to share your finished skirts with us on our Facebook page so we can see all your sure-to-be-adorable results!